Zenodo Release Recipe
This recipe provides a hands-on guide to publishing released files and folders to Zenodo and obtaining a Digital Object Identifier (DOI).
Step 1: Select Items in File Explorer
- Navigate to the File Explorer in Accelerator.
- Select all files and folders you wish to include in the release.
- Open the ACTIONS menu located at the top right of the file list.
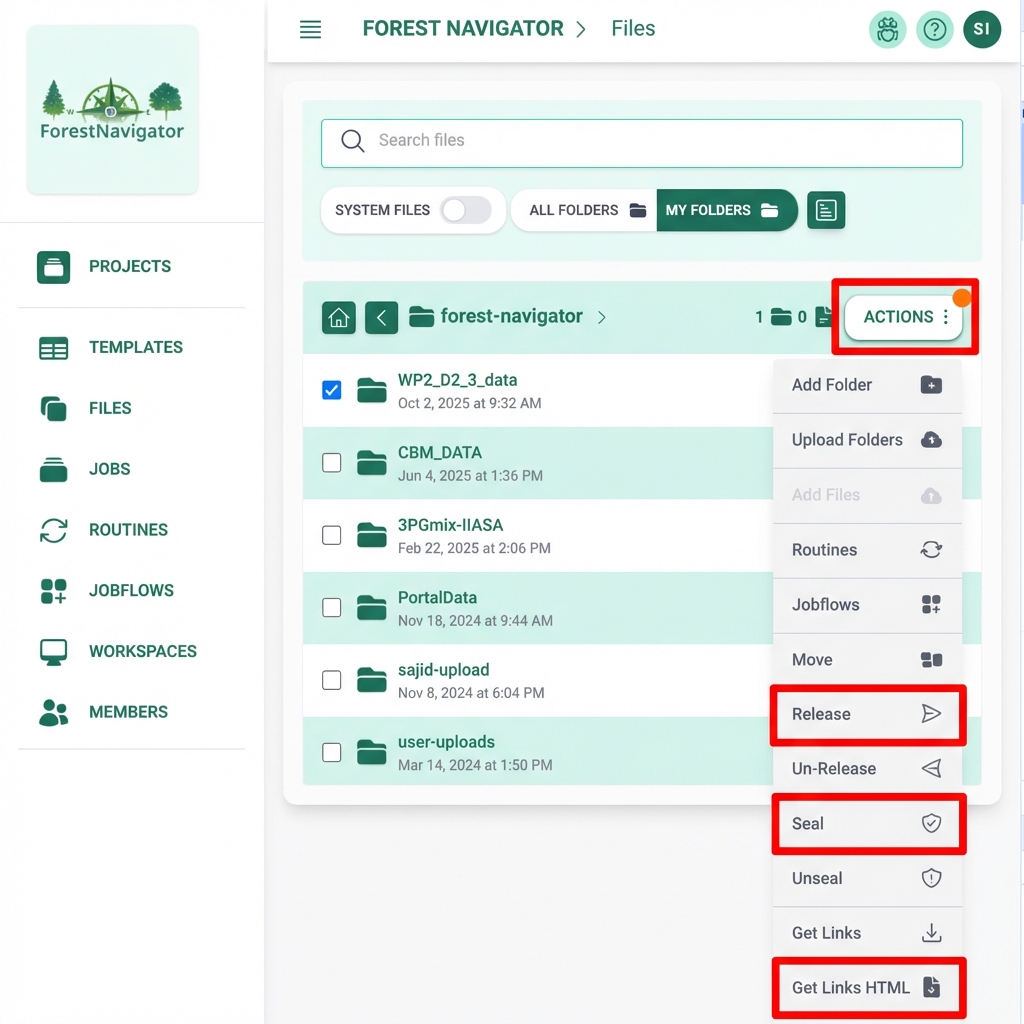
Step 2: Seal and Release
Before generating the links, you must ensure the data is immutable and officially released:
- In the ACTIONS menu, select Seal to make the selected items read-only.
- In the same menu, select Release to mark them as part of a public release.
IMPORTANT
Sealing and Releasing files ensures that the links generated in the next step remain valid and the data cannot be modified after the DOI is issued.
Step 3: Generate and Customize HTML Index
- In the ACTIONS menu, select Get Links HTML.
- An HTML file will be generated and downloaded.
- Open the downloaded HTML file in a text editor.
- Customize the title by replacing
--- ENTER PROJECT TITLE HERE ---.
The header of your HTML file should look something like this:
html
<html>
    <head>
        <title>My Project Release Title</title>
    </head>
    <body>
        <div class="header">
            <h1>My Project Release Title</h1>
            <div class="breadcrumb">
                Selected Items (1 folders, 0 files)
            </div>
        </div>
        <ul><li><details open><summary><strong>Simple_Baseline</strong></summary><ul><li><span class="icon">📄</span><a class="file" href="...">...</a></li></ul></details></li></ul>
    </body>
</html>
Step 4: Create a GitHub Repository
- Create a new repository on GitHub.
- Upload the customized HTML file (e.g., as
index.html) and aREADME.mdfile. - In
README.md, include all relevant metadata about the release (authors, description, license). - GitHub Pages: Go to repository Settings -> Pages and enable hosting from the
mainbranch. This will give you a public URL for your data index. - Include this GitHub Pages URL in your
README.md.
Step 5: Create a GitHub Release
- On your GitHub repository page, click on Create a new release.
- Assign a version tag (e.g.,
v1.0.0). - Provide a title and description for the release.
- Click Publish release.
Step 6: Zenodo DOI Generation
Zenodo integrates directly with GitHub to provide permanent archival and DOIs:
- Log in to Zenodo: Visit zenodo.org and log in using your GitHub account.
- Enable Repository: Navigate to the GitHub section in your Zenodo profile and flip the switch to On for the repository you just created.
- Trigger Archiving: Zenodo will now watch for new releases. Since you already created a release in Step 5, you may need to click 'Check now' or create a new 'Point' release (like
v1.0.1) to trigger the first archival. - Get your DOI: Once Zenodo finishes processing the release, it will assign a DOI (e.g.,
10.5281/zenodo.XXXXX). - Update README: It is a best practice to go back to your
README.mdon GitHub and add the Zenodo DOI badge so users can easily cite your data.
TIP
This workflow ensures that your data is not only accessible via a user-friendly HTML interface but also academically citable and preserved for the long term.