🧪 Getting Started with Data Validation Workflow
This guide walks you through the process of defining and using data validation templates in the Accelerator platform — from creation to applying them on datasets.
🧱 Step 1: Create a Validation Template
- Navigate to the Templates section of your project space.
- Click the “Add” button to create a new validation template.
- Fill in the form that appears.

🗂️ Step 2: Define Schema and Metadata
In the template form:
- Select a dataset category:
csv_timeseriesregional_timeseriesraster_timeseries
- Enter a name for your template
- Provide an extended JSON schema that outlines:
- Required columns
- Column data types
- Structural constraints
Here’s an example schema for a Regional Timeseries dataset:
{
  "root": {
    "type": "object",
    "required": [
      "model",
      "region",
      "variable",
      "scenario",
      "unit",
      "year",
      "value",
      "item"
    ],
    "properties": {
      "item": { "type": "string" },
      "unit": { "type": "string" },
      "year": { "type": "number" },
      "model": { "type": "string" },
      "value": { "type": "number" },
      "region": { "type": "string" },
      "scenario": { "type": "string" },
      "variable": { "type": "string" }
    }
  },
  "template_validators": "not defined",
  "root_schema_declarations": {
    "time_dimension": "year",
    "unit_dimension": "unit",
    "value_dimension": "value",
    "region_dimension": "region",
    "variable_dimension": "variable",
    "final_dimensions_order": [
      "model",
      "scenario",
      "region",
      "variable",
      "item",
      "year",
      "value",
      "unit"
    ],
    "region_boundary_file_link": "https://raw.githubusercontent.com/johan/world.geo.json/master/countries.geo.json"
  }
}
🔎 Schema Rule Writing Guide will be covered in a separate advanced document.
💾 Step 3: Save and Use the Template
Once your template is saved, you can use it in validation routines.
📥 Step 4: Download and Update Template via CSV
You can also manage your template schema using CSV files, which is useful for bulk updates or version control.
- Navigate to the Templates section and click on an existing template to open the update form (similar to Step 1).
- Click the “Download Template” button to download the current schema as a CSV file.
- Open the CSV file, make your desired changes, and save it.
- Return to the form and click “Update with CSVs”.
- Upload your modified CSV file to update the template schema.
🚀 Step 5: Validate a Dataset via GUI
- Go to the File Explorer
- Select a dataset file
- Click on “Actions” → “Run Routine”
- Choose “Regional Timeseries Validator” from the list
- Select your template from the dropdown
- Click Launch
The routine will:
- Load your template
- Validate the selected dataset against it
- Output detailed validation results in the routine logs
� Step 6: Check Validation Logs
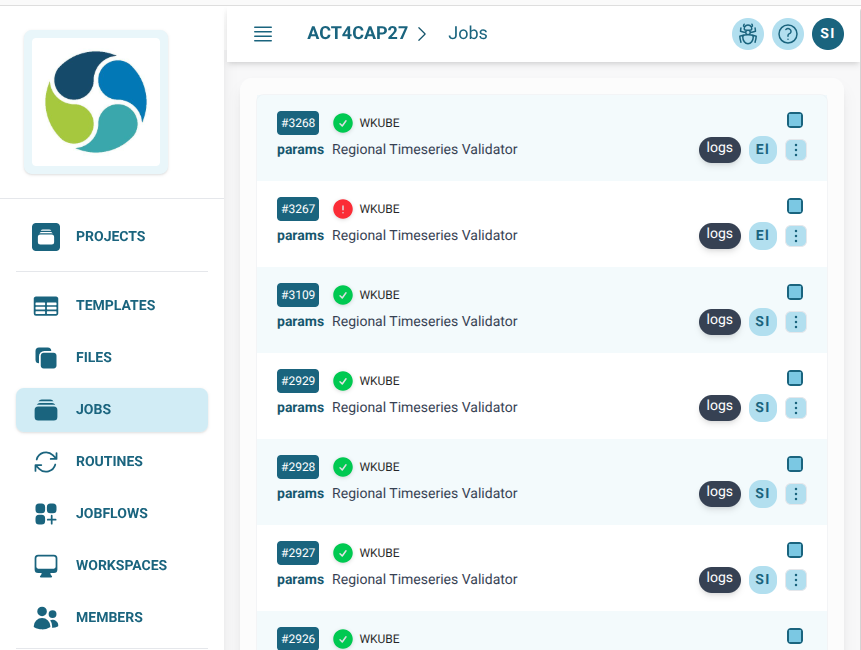
Once a validation task is launched, you can track its progress and review the output via the Jobs system.
- Get the Job ID: After clicking Launch in Step 5, the platform will provide a Job ID (e.g.,
#3267). This acts as your tracking number. - Navigate to Jobs: Click on “Jobs” in the sidebar menu.
- Locate your Job: Find your task in the list of running or recent jobs.
- View Logs: Click the “logs” button next to your job to open the log view modal.
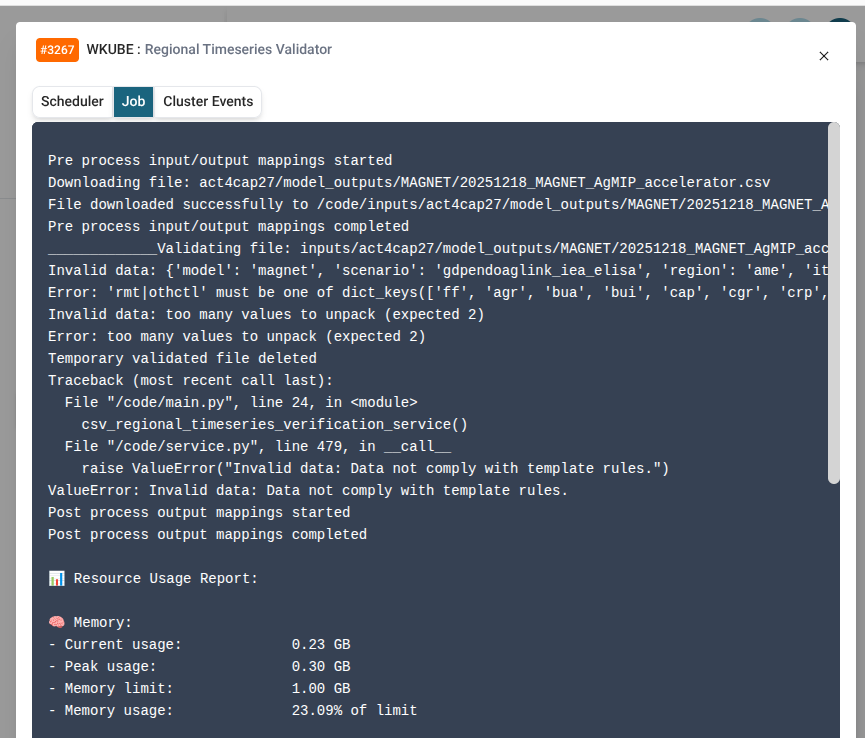
Understanding the Log Tabs
The log modal contains three distinct tabs to help you debug and verify results:
- Scheduler: Displays logs related to the orchestration and lifecycle of the job.
- Job: Displays the actual validation output. This is where you'll see schema errors, success messages, and the logic-level feedback from the validator.
- Cluster Events: Provides infrastructure-level events, such as when the container was created or if there were resource issues.
🔗 Step 7: Merge Datasets
Once you have multiple datasets that adhere to the same validation template, you can merge them into a single consolidated file.
- Go to the File Explorer.
- Select two or more files that you wish to merge.
IMPORTANT
All selected files must adhere to the same validation template for a successful merge.
- Click on “Actions” → “Run Routine”.
- Choose “Regional Timeseries Merger” from the list.
- Select the appropriate template and Launch.
Just like validation, the merger will trigger a job. You can track its progress and view the consolidation logs by following the same process described in Step 6.
✅ Summary
| Step | Action |
|---|---|
| 1 | Create a validation template |
| 2 | Define dataset type and schema |
| 3 | Save the template |
| 4 | Download / Update template via CSV |
| 5 | Run Validator routine on a file |
| 6 | Check and interpret validation logs |
| 7 | Select multiple files → Merge |
Validation templates help ensure data quality, consistency, and compatibility across routines and workflows.